6x8 Shed Building Plans: A Simple Guide for Your Backyard Shed
So, you're thinking about building a 6x8 shed? Fantastic! That's a perfectly sized shed for a whole host of uses â€" storing garden tools, bikes, lawnmowers, even a small workshop if you’re feeling ambitious. Building your own shed can be a really rewarding experience, a testament to your DIY skills, and a whole lot cheaper than buying a pre-fabricated one. This guide will walk you through the basics, keeping it simple and friendly â€" no complicated jargon or intimidating engineering diagrams here!
Planning Your 6x8 Shed
Before you even think about hammering a nail, proper planning is key. This isn't just about grabbing some wood and hoping for the best. We need a solid plan. Think of this stage as laying the foundation (pun intended!) for a successful build.
Choosing a Location
Where will your shed live? Consider these factors:
- Accessibility: Do you have easy access for delivery of materials? Will you be able to maneuver the materials and tools around easily during construction?
- Sunlight: How much sun does the area receive? This might influence your choice of materials and even the internal layout.
- Drainage: Is the ground level and well-drained? You don't want your shed sitting in a puddle after a heavy rain.
- Local Regulations: Check your local building codes and regulations. There might be restrictions on shed size, placement, and materials.
Designing Your Shed
A 6x8 shed offers a surprisingly versatile space, but think about how you want to use it.
- Door placement: Consider which side will be easiest to access and where the door won't obstruct your workflow.
- Window placement: Windows provide natural light and ventilation. Consider placement for maximizing light and minimizing heat build-up.
- Shelving and storage: Plan for built-in shelving or storage solutions to maximize space. Sketch it out â€" a simple drawing will help immensely.
- Foundation type: Concrete slab, gravel base, or wooden sleepers? Each has pros and cons; choose what suits your budget, skill level, and ground conditions.
Gathering Your Materials and Tools
This is where the fun (and maybe slightly stressful) part begins! You'll need a good mix of materials and tools. It’s always better to have a little extra of everything rather than running to the store mid-project.
Materials List (Approximate):
This is a general list, and quantities will depend on your specific design. Always check your plans for precise measurements!
- Pressure-treated lumber (for the base, framing, and siding)
- Roofing materials (shingles, felt underlayment)
- Plywood for the floor and roof sheathing
- Exterior-grade screws and nails
- Door and window (pre-made or DIY)
- Optional: Concrete mix (for a concrete foundation)
- Optional: Paint or stain for the exterior
Tools You'll Need:
- Measuring tape
- Level
- Saw (circular saw, hand saw, or miter saw)
- Drill with various drill bits
- Hammer
- Shovel (if building a gravel or concrete base)
- Post hole digger (if using concrete piers)
- Safety glasses and work gloves
Building Your 6x8 Shed: Step-by-Step (Simplified)
Building a shed is a process, not a race. Take your time, double-check your measurements, and enjoy the journey! This is a highly simplified overview. Detailed plans are essential for a successful build.
Step 1: Prepare the Site
Clear the area, level the ground, and build your chosen foundation. This is crucial for a stable and long-lasting shed.
Step 2: Build the Floor
Construct the floor frame and cover it with plywood. Ensure it’s level and sturdy.
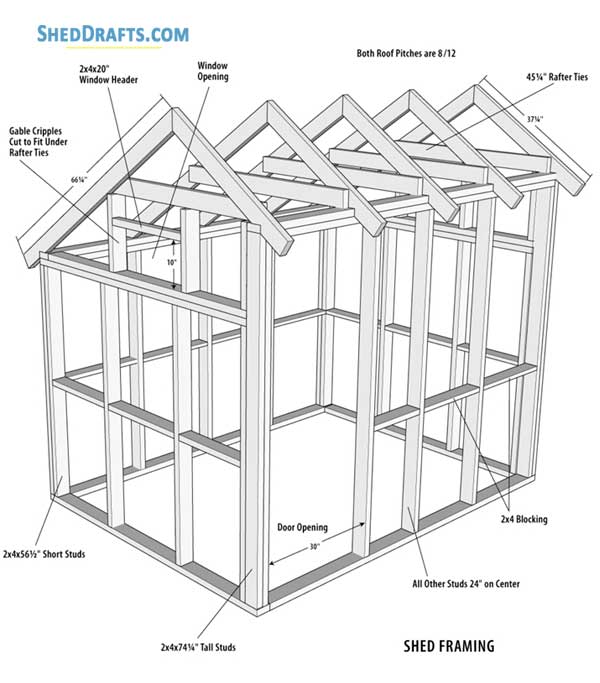
Step 3: Frame the Walls
Build the wall frames according to your plans. Remember to include openings for doors and windows.
Step 4: Erect the Walls
Carefully lift and attach the wall frames to the floor. Use bracing to keep them square and plumb.
Step 5: Install the Roof
Build the roof trusses (or use pre-made ones) and attach them to the top plates of the walls. Add roof sheathing.
Step 6: Install Roofing Materials
Apply roofing felt and then your chosen roofing material (shingles, metal, etc.).
Step 7: Add Doors and Windows
Install the doors and windows according to the manufacturer's instructions.
Step 8: Finish the Exterior
Add siding (if desired), trim, and any other exterior finishing touches.
Tips for Success
- Read your plans thoroughly: Before you start, understand every step. Don’t be afraid to ask for help if you're unsure about anything.
- Take your time: Rushing can lead to mistakes. A slow, careful approach will result in a better shed.
- Use the right tools: Invest in quality tools; they’ll make the job easier and more efficient.
- Ask for help: Don't be afraid to ask friends or family for assistance, especially for the more physically demanding tasks.
- Check your work regularly: Regularly check for squareness and levelness to prevent problems later on.
Commonly Asked Questions
Building a shed inevitably raises questions. Here are some common ones:
Q: Do I need a building permit?
A: This depends on your local regulations. Check with your local council or planning department to confirm.
Q: What kind of wood should I use?
A: Pressure-treated lumber is recommended for its resistance to rot and insects.
Q: How long will it take to build?
A: This varies greatly depending on your experience and the complexity of your design. Allow ample time â€" it's better to finish slowly and correctly than rush and make mistakes.
Q: How much will it cost?
A: The cost depends on materials, foundation type, and your chosen finishes. Expect it to be significantly cheaper than a pre-built shed, but still a worthwhile investment.
Q: Can I make changes to the plans?
A: You can make changes, but ensure they don't compromise the structural integrity of the shed. If you're unsure, consult with someone with building experience.
Building a 6x8 shed can be a fun, rewarding, and ultimately cost-effective project. Remember to plan carefully, gather your materials, and take your time. Happy building!
0 comments:
Post a Comment
Note: Only a member of this blog may post a comment.